

As developers who have performed various tests and installations in different environments, we recommend that you install the WhatsMail application on an Ubuntu server, especially version 20. We have solid reasons for this. First, on a VPS, you can install PM2 and run it as a startup, ensuring the Node server won’t go down even after a server restart for optimization. On cPanel, not all environments support PM2, or even Node servers themselves.
To install Nginx on Ubuntu, use the following command:
                    sudo apt update
                    sudo apt install nginx
Make sure the firewall is active. You can check it with this command:
sudo ufw app list
The output should look like this:
              Output
              Available applications:
                Nginx Full
                Nginx HTTP
                Nginx HTTPS
                OpenSSH
To check if Nginx is installed and running, use the systemctl status nginx command. If Nginx is successfully installed and running, it will show as online.
Run the following commands one by one to install PHP version 8.2 on the Ubuntu server:
sudo apt-get install software-properties-common
sudo add-apt-repository ppa:ondrej/php
sudo apt-get install -y php8.2-cli php8.2-common php8.2-mysql php8.2-zip php8.2-gd php8.2-mbstring php8.2-curl php8.2-xml php8.2-bcmath php8.2-fpm php8.2-intl
To verify PHP installation, run the php -v command. If PHP is installed, it will display the version number.
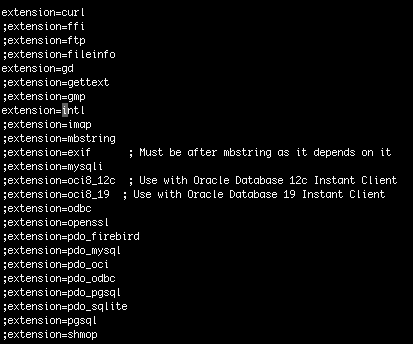
Next, open the php.ini file to enable some extensions that are disabled by default. The php.ini file is typically located at /etc/php/8.2/fpm/php.ini. Enable the necessary extensions by removing the ; in front of the extension name. See the image below for reference:

Run the command sudo systemctl restart php8.2-fpm to apply the changes.
To install MySQL on the Ubuntu server, run the following command:
sudo apt install mysql-server
To ensure MySQL is properly installed and running, use this command: sudo systemctl start mysql.service.
Run the following command to install PhpMyAdmin:
sudo apt install phpmyadmin
You will be prompted to choose a server; do not select any options because Nginx is being used in this tutorial. After PhpMyAdmin is installed, run the following command:
sudo ln -s /usr/share/phpmyadmin /var/www/html/phpmyadmin
This command creates a shortcut to access PhpMyAdmin. However, you won’t be able to open PhpMyAdmin with a subdomain or domain just yet. Follow these steps to create a server block in Ubuntu:
/etc/nginx/sites-availabledb.mdhpos.com:
sudo nano db.mdhpos.com
Next, insert the following script:
server { listen 80; server_name db.mdhpos.com; root /var/www/html/db; index index.php index.html index.htm; location / { try_files $uri $uri/ /index.php; } location ~ \.php$ { fastcgi_pass unix:/run/php/php8.1-fpm.sock; fastcgi_param SCRIPT_FILENAME $document_root$fastcgi_script_name; include fastcgi_params; include snippets/fastcgi-php.conf; fastcgi_read_timeout 3000; } location ~* \.(jpg|jpeg|gif|png|webp|svg|woff|woff2|ttf|css|js|ico|xml)$ { access_log off; log_not_found off; expires 360d; } location ~ /\.ht { access_log off; log_not_found off; deny all; } }
Replace db.mdhpos.com with your subdomain or domain name.
sudo ln -s /etc/nginx/sites-available/db.mdhpos.com /etc/nginx/sites-enabled/
Replace db.mdhpos.com with the file name you created in /etc/nginx/sites-available. Then restart Nginx with sudo systemctl restart nginx.
Now, try to open your domain. If everything is configured correctly, you should see PhpMyAdmin at your domain.